roblem: The GF misses her dog when she's away from the house. I need a Valentine's day present. Solution: Over engineering!
Enter the Raspberry Pi Survellience System. Using the R-Pi's cheap hardware and a generic USB webcam, you can construct a basic home-survellience system, for pets or theft-prevention.
Update: The main takeaway from this article should be to not use outdated software. It was troublesome and buggy to use Motion, as it hasn't been updated since 2014. I did not realize this at first. Learn from my mistakes, and check GitHub Pulse or community chatter before commiting to tech. For home survellience ZoneMinder currently seems to be the best solution.
Installing The Operating System
The Pi itself is a full fledged computer, with much more RAM and processing power than a microcontroller like Arduinio. Thus, the Pi requires an Operating System (OS) for software to interface with its hardware. Linux is a free, open-source OS with a variety of distributions, each with their own flavors, abilities, and idiosyncrasies. Raspian is the one made specifically with the Pi in mind.
There are already a lot of great resources for installing an OS onto the Pi, and I don't think I can add much to that discussion. If your Pi did not come with an OS pre-installed (mine did) then follow the links below to get it up and running.
- Raspbian download
- NOOBS software instructions
- 'Advanced' users instructions
- Tutorial
- Another tutorial
Connect to the Internet
If you have the ethernet cable, plug in the Pi and connect to it via SSH (covered in next section), then follow the instructions below to setup Wi-Fi.
If you have the Wi-Fi dongle, Monitor, HDMI cable, and USB Keyboard plug them all into the Pi and turn it on. After it boots, run
1
sudo iwlist wlan0 scan #scan for local wifi networks. "ESSID" values are the names of found networks
to find your Wi-Fi's ESSID value. Next, edit the wpa_supplicant to add an entry for your Wi-Fi
1
2
3
4
5
6
7
sudo nano /etc/wpa_supplicant/wpa_supplicant.conf #add new entry to known wifi's

#Go to the bottom of the file and add the following:
network={
    ssid="The_ESSID_from_earlier"
    psk="Your_wifi_password"
}
Setup SSH
Secure shell (SSH) is a way to securely access your Pi over the internet. Enabling SSH will prevent you from needing a dedicated keyboard and monitor to interface with the Pi, instead you can access it remotely from your day-to-day computer. The Pi will be running an SSH server, and you can connect to it from your computer similar to how you can connect to a web server with a browser. The main difference between the two being that SSH is a secure connection with root access (default port #22), while HTTP is not (default port #80).
First step is finding your Pi's Local Area Network (LAN) Internet Protocol (IP) address. For background, your LAN is essentially all devices that connect to your ISP's modem. This allows all of your local devices to connect to the internet through the same IP address (your modem's IP), allowing implementation of firewalls, advanced security, and faster local networking than is achievable over a WAN. The router provides Wi-Fi/Wireless LAN. IP is a type of communications protocol that forms the foundation of computer inter-networking that establishes the internet. An IP address is the info computer's must have to know who they are talking to. So, to connect to your Pi via SSH you first must find its LAN IP address.
Go to your Pi and enter the command:
1
ip addr #see LAN ip address of networking interfaces
This will print out a bunch of info about your networking interfaces. The 'lo' interface is your loopback, the computer uses it to communicate with itself, and it can be ignored. eth0 is the ethernet interface, if you are connecting via ethernet then you want to look at this. If you are using Wi-Fi, then look at the wlan0 interface. The LAN IP address with have the title 'inet' and look something like '192.168.0.1'. Write it down
1
2
3
4
5
6
7
8
9
10
11
#output looks something like this. These are the networking interfaces available on your machine. Look for the 'inet' address
1: lo: <LOOPBACK,UP,LOWER_UP> mtu 65536 qdisc noqueue state UNKNOWN #this is a special interface the computer uses to communicate with itself. You can ignore it
link/loopback 00:00:00:00:00:00 brd 00:00:00:00:00:00
inet 127.0.0.1/8 scope host lo
valid_lft forever preferred_lft forever
2: eth0: <NO-CARRIER,BROADCAST,MULTICAST,UP> mtu 1500 qdisc pfifo_fast state DOWN mode DEFAULT qlen 1000#This is the ethernet interface, write down the inet value (which does not appear here but would if ethernet were connected)
link/ether b8:27:eb:61:48:be brd ff:ff:ff:ff:ff:ff
3: wlan0: <BROADCAST,MULTICAST,UP,LOWER_UP> mtu 1500 qdisc mq state UP qlen 1000 #this is the Wi-Fi interface. inet/LAN IP value is 192.168.0.100, you can ignore the /24
link/ether 00:0f:55:a8:fc:62 brd ff:ff:ff:ff:ff:ff
inet 192.168.0.100/24 brd 192.168.0.99 scope global wlan0
valid_lft forever preferred_lft forever
If you're connecting from a Linux or Mac computer, ssh is as easy as opening a terminal and typing
1
2
#connecting with ssh. Windows users need PuTTy
ssh pi@The_IP_from_earlier
If you are on Windows, you will need to use some software to help. My favorite is PuTTy. Download it and follow the instructions to get setup.
That's it! You should be connected now!
If SSH is not working, plug your Pi back into the monitor and check that SSH is enabled by entering the command
1
2
#from your pi, ensure SSH is enabled under 'Advanced' settings
sudo raspi-config
Navigate to the 'Advanced' settings, and then 'SSH'. Ensure it is enabled.
If it's still not working, double check that your Pi has internet access. If you could not see the 'inet' value from before, your Pi is not connected. You can also try pinging a few popular websites to look for a response.
1
2
3
4
#check internet connection
ping www.google.com #A good response (no dropped packets) indicates you are connected to the internet
ping www.facebook.com
ping www.stackoverflow.com
Lastly, you can try restarting the SSH server. Like a web-server, an SSH server can occasionally become messed up and need a restart. It's happened to me before with dynamic IPs. Do so with
1
2
#last-ditch effort: restart ssh server to get it working
sudo service ssh restart #double check that SSH server is good to go
Update
This part is easy. Ensure that your firmware and software are up-to-date by running these commands in the Pi's terminal. It will likely take the Pi awhile to run.
1
2
3
4
5
#updating pi
sudo apt-get install rpi-update #rpi-update is a package that manages Pi's firmware updates
sudo rpi-update #run the package for the updates
sudo apt-get update #fetch new versions of Linux software
sudo apt-get upgrade #apply the fetched updates
Setup Motion
Motion is surveillance software written for Linux in C. It is strictly a command-line tool that can also be run as a daemon, making it perfect for a hands-off, embedded system. FYI, there are alternatives available that can do the same job (ZoneMinder if you later wish to try different options.
Perhaps the most important info in this tutorial is how to install Motion. Typically, linux software is installed using 'sudo apt-get X', but doing so with Motion will give you outdated software. Stream-authentication and other features will be disabled if you go this route. Instead, we will download the source from GitHub, compile it, and manually add it to the Linux registers. Don't worry though, it's very easy to accomplish:
1
2
3
4
5
6
7
#installing motion
git clone http://github.com/sackmotion/motion #most up-to-date version with authentication patch! Do not use 'apt-get install motion'!!!
cd motion #move into new motion directory
./configure #gets the software ready to build on your specific system. I needed to install a dependency (libjpeg-dev) by entering 'sudo apt-get install libjpeg-dev'
make #builds/compiles the source code into a machine readable program with help from a Makefile
sudo make install #copies the built files to final destination
sudo mv /usr/local/etc/motion-dist.conf /usr/local/etc/motion.conf #must rename the distribution (default) file to let Motion know it is now user-configured.
If you want more info about this process, here is a good blog I found detailing the commands a bit more.
Next up is editing Motion's configuration file. Here is where we can change the quality of the camera, enable web streaming, enable web authentication, etc. For all the configuration options, check here. When you edit the config file, there should be a lot of options and comments explaining them already there. If not, you can copy+paste the default config file from Motion's GitHub Repo. You can check my motion.conf file on GitHub here. Check out the default file, my file, and fiddle with options to see what you like.
Here are some of the useful options and what they do: daemon on (background mode), height or width (resolution), webcam_quality (jpeg compression) stream_maxrate and framerate (sets framerate), stream_authentication and stream_auth_method (enable authentication), webcam_localhost and control_localhost (turn off to allow motion to stream to non-localhost).
1
2
3
#editing motion.conf
sudo nano /usr/local/etc/motion.conf #options
sudo motion #run the motion program! If this doesn't work, try 'sudo /usr/local/bin/motion' (where Motion's executable should be located)
Motion is now up and running! Ensure that it is working by entering {Pi-IP-ADDR}:8081 (assuming you did not change Motion's port in motion.conf) into your computer's browser (within your home's LAN). If your USB camera is plugged in then a video will be displayed, otherwise a gray rectangle will appear.
Setting up Static IP Address
As I was figuring out this Motion stuff, I encountered a strange problem: randomly SSH stopped working. I checked that the Pi and my computer were connected to the internet and then checked the Pi's IP address. To my surprise found that it had changed! I tried to connect to the new IP and it still failed. Eventually I restarted the SSH server on the Pi, used the IP address the Pi gave me and it worked.
That extremely interesting story is given just to demonstrate that IPs are not static by default inside a LAN. Routers use something called Dynamic Host Configuration Protocol (DHCP) that automatically assigns IP addresses as devices enter and leave the LAN. If the addresses were all static, there would be a limited number of devices that could ever enter the LAN. There are trade-offs to having a static vs dynamic IP address, but in this application I believe a static one is better. Having the Pi maintain a static IP allows for easy & consistent SSH and web connections. Sticking with the default dynamic IP address will make your pi a bit more difficult for a home invader in your LAN to SSH into, but it will require the use of a Dynamic Domain Name System (DDNS) service. When you enter a website name into the browser, DNS name servers around the globe map the URL text to the IP of the server you are attempting to connect to. With a dynamic IP you will need to pay for a service like NoIP, DynDNS or ComEXE (Chinese). I have heard of a free solution called DuckDNS, but I have not tested it. Regardless, all these solutions increase complexity with a negligible security trade-off.
I followed the instructions from ModMyPi to setup a static IP.
1
2
3
4
5
6
7
8
9
10
11
12
13
14
15
16
17
18
#setup static IP address on your Pi
ifconfig #prints out info about your networking interfaces
#write down inet addr (Pi's Current IP Address), Bcast (The Broadcast IP Range), Mask (Subnet Mask Address)
netstat -nr #displays IP routing table
#write down Gateway and destination addresses
sudo nano /etc/network/interfaces #edit Pi's network interfaces. wlan0 if using Wi-Fi, eth0 if using ethernet
#change 'iface eth0 inet dhcp' to 'iface eth0 inet static' or for wlan0, change 'iface default inet dhcp' to 'iface default inet static'
#directly below that line, enter the following lines with the info gathered previously
address 192.168.0.100 #address you wish to assign to Pi. Must be in network range, and is best to give the last number a high value to avoid taking another device's IP
netmask 255.255.255.0 #Mask value from earlier
network 192.168.0.0 #Destination address from earlier
broadcast 192.168.0.255 #Bcast address from earlier
gateway 192.168.0.1 #Gateway address from earlier
#control-X, Y, Enter to exit and save the file in nano
sudo rm /var/lib/dhcp/* #Remove any existing leases
sudo reboot
#log-in and check new inet address using
ifconfig #or 'ip addr'
Setting up Apache Web Server
Apache is the world's most used web server software. It is one of the easiest to get a small site running and has a ton of documentation available. Apache, and all other HTTP web servers, run by default on port 80. Before, when we saw Motion's output by entering
1
sudo apt-get install apache2 #install the web site software
That's it! If put {Pi-IP} in URL bar in the browser, a default apache welcome screen will appear. This page will be located in /var/www/html/index.html (or maybe /var/www/index.html). Edit the index.html page to change the landing page of your site. Add more HTML pages to expand your site.
It is recommended that you do not use port 80 for your home server. Some ISPs will automatically block this port and prevent forwarding, it also makes you home server more likely to be hacked. To use a different port, you need to edit your Apache configuration.
1
2
3
4
#edit port for accessing Apache web server
sudo nano /etc/apache2/ports.conf
#change the 'Listen 80' line to another port, 8079 for example
Listen 8079
Now to access your web page, enter {IP}:{New_Port_Number} into the browser.
To embed the video in the site, use an iframe in your index.html page. An iframe is just a window into another page, in this case Motion's video streaming (which is available in your LAN on a different port).
1
2
3
#Edit website landing page
#I suggest developing on a computer other than the Pi, and using Git to transfer the files in between them
sudo nano /var/www/index.html
1
2
<!-- Add this line to your website's landing page to include video-->
<iframe src="http://<PI-IP>:8081" height="750" width="1300"></iframe>
If you go to your Pi's IP in your computer's browser you'll see your video! If you enabled stream_authentication in motion.conf earlier, then it will require a password to view. If you would also like to password protect your web server then you will need to setup htaccess with Apache server. Digital Ocean has a great guide on how to do this here.
1
2
3
4
5
6
7
8
9
10
11
12
13
14
# Password protect web server
sudo apt-get install apache2-utils
sudo htpasswd -c /etc/apache2/.htpasswd new_user #create a user, it will prompt for a password. For all subsequent users, remove the -c flag from this command
cd /etc/apache2/sites-enabled
#if using ssl, modify default-ssl file. If using HTTP, modify 000-default
#look for the '<Directory /var/www/> ........ </Directory>' text
# inside of this 'Directory' tag, ensure that these two lines exist: "AllowOverride All" and "Require all granted"
sudo nano /var/www/.htaccess #create .htaccess for managing the password protected connection
	#copy this text into the new .htaccess file
	AuthType Basic
	AuthName "Restricted Content"
	AuthUserFile /etc/apache2/.htpasswd
	Require valid-user
service apache2 restart #restart the server
Now your web server and your Motion server will be password protected! You can use different passwords and usernames for each if you wish.
Setting up Static IP Address
As I was figuring out this Motion stuff, I encountered a strange problem: randomly SSH stopped working. I checked that the Pi and my computer were connected to the internet and then checked the Pi's IP address. To my surprise found that it had changed! I tried to connect to the new IP and it still failed. Eventually I restarted the SSH server on the Pi, used the IP address the Pi gave me and it worked.
That extremely interesting story is given just to demonstrate that IPs are not static by default inside a LAN. Routers use something called Dynamic Host Configuration Protocol (DHCP) that automatically assigns IP addresses as devices enter and leave the LAN. If the addresses were all static, there would be a limited number of devices that could ever enter the LAN. There are trade-offs to having a static vs dynamic IP address, but in this application I believe a static one is better. Having the Pi maintain a static IP allows for easy & consistent SSH and web connections. Sticking with the default dynamic IP address will make your pi a bit more difficult for a home invader in your LAN to SSH into, but it will require the use of a Dynamic Domain Name System (DDNS) service. When you enter a website name into the browser, DNS name servers around the globe map the URL text to the IP of the server you are attempting to connect to. With a dynamic IP you will need to pay for a service like NoIP, DynDNS or ComEXE (Chinese). I have heard of a free solution called DuckDNS, but I have not tested it. Regardless, all these solutions increase complexity with a negligible security trade-off.
I followed the instructions from ModMyPi to setup a static IP.
1
2
3
4
5
6
7
8
9
10
11
12
13
14
15
16
17
18
#setup static IP address on your Pi
ifconfig #prints out info about your networking interfaces
#write down inet addr (Pi's Current IP Address), Bcast (The Broadcast IP Range), Mask (Subnet Mask Address)
netstat -nr #displays IP routing table
#write down Gateway and destination addresses
sudo nano /etc/network/interfaces #edit Pi's network interfaces. wlan0 if using Wi-Fi, eth0 if using ethernet
#change 'iface eth0 inet dhcp' to 'iface eth0 inet static' or for wlan0, change 'iface default inet dhcp' to 'iface default inet static'
#directly below that line, enter the following lines with the info gathered previously
address 192.168.0.100 #address you wish to assign to Pi. Must be in network range, and is best to give the last number a high value to avoid taking another device's IP
netmask 255.255.255.0 #Mask value from earlier
network 192.168.0.0 #Destination address from earlier
broadcast 192.168.0.255 #Bcast address from earlier
gateway 192.168.0.1 #Gateway address from earlier
#control-X, Y, Enter to exit and save the file in nano
sudo rm /var/lib/dhcp/* #Remove any existing leases
sudo reboot
#log-in and check new inet address using
ifconfig #or 'ip addr'
Make it Viewable on the Web
So far, everything we've done has only been viewable in the local network. But what if you want to see your cameras from outside the house? Now that we have the stream and the site password protected, we can expose the site to the web. Don't tell many people about the site though! The more that people connect to your Pi (even without logging in) the more load it will have to process, and the more data you will use from your ISP.
First step is to set up port forwarding. Since your whole home has only 1 public IP address, you need to configure your router to take requests and route them to the correct device's IP and port. You can find your IP in a variety of ways, the easiest is to simple click here (Google it!). Port forwarding will take incoming requests to your public IP, and route them to the correct local IP and port number. To do so you must log into your router.
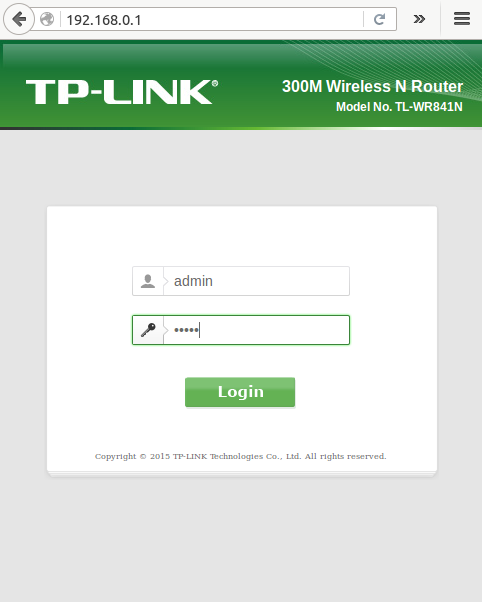
Routers made by different companies will have different log-in steps. Typically though, you will enter your router's IP address (192.168.0.1 by default) into the browser and log-in with the default credentials visible on the bottom of the router. Usually the username and password are both 'admin', or maybe the username is 'admin' with no password.
Once logged in, navigate to the 'Forwarding' or 'Port-Forwarding' section. Here we will setup some records that will translate requests at a specific port on your public IP to be routed to a local IP. Remember, by default HTTP requests are at port 80, and HTTPS requests are at 443. If using a custom port then a colon and number (:XXXX) must be appended to the end of the url. Here is a screenshot of my setup, and some useful info from TPLink's router as well. My Motion server is available on port 8081, and my web server is on port 8079 (as discussed in the Apache section).
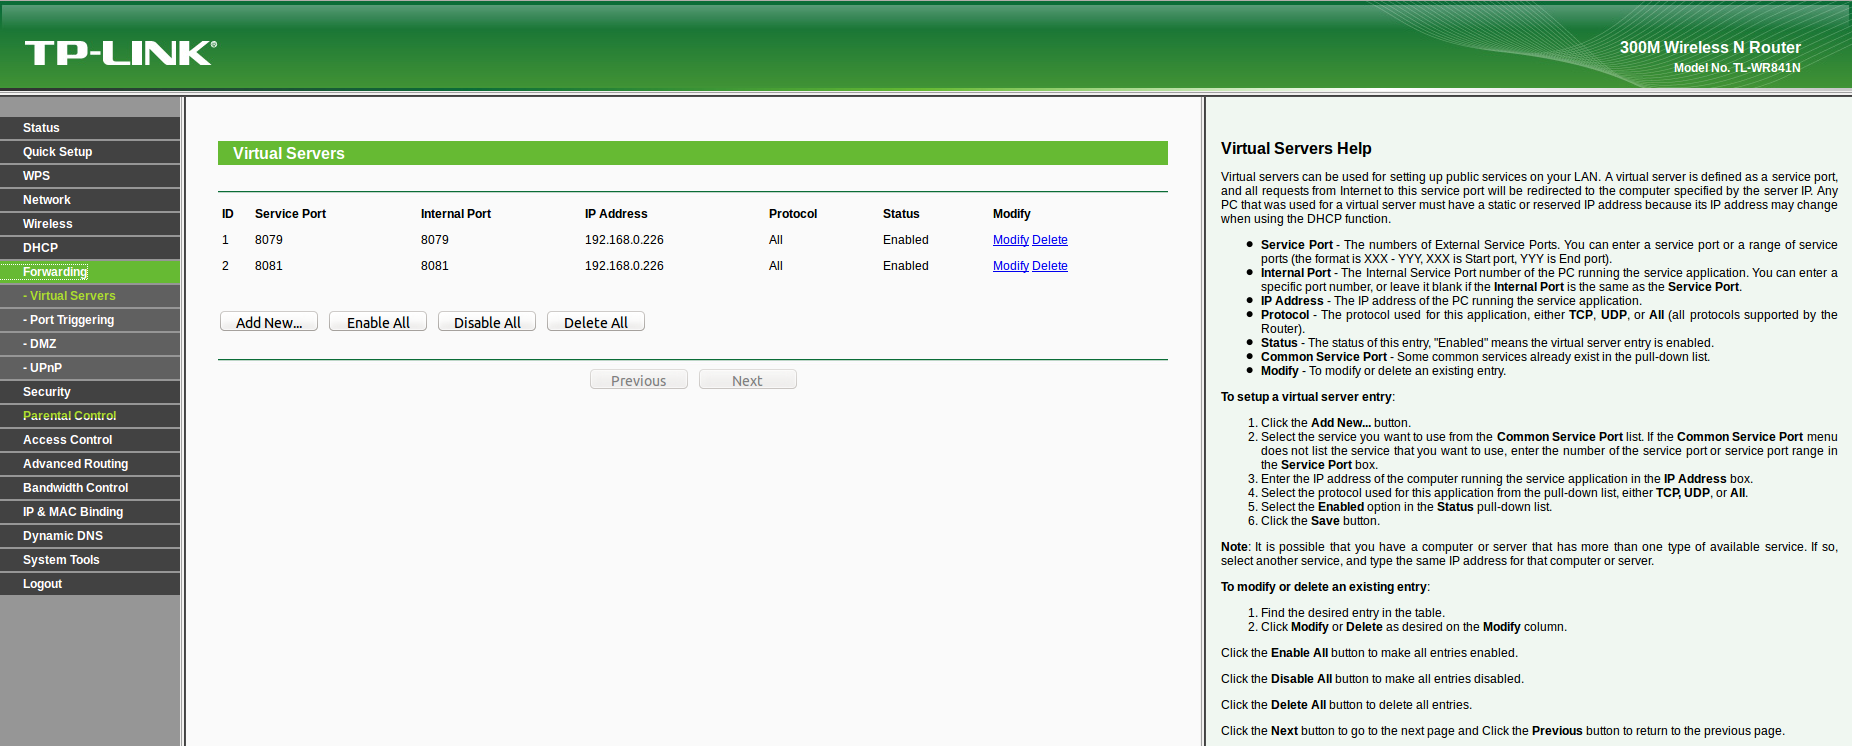
With that, your site and video stream are active! You can put your public IP and port number into any browser and view the output.
Typing in an IP address every time you want to view your site will get a bit tedious, it's best to connect it to a Domain Name. Instead of an IP, we will be able to type words into the browser's URL to reach our site. To do this, you will need a yearly subscription from a domain name registrar (don't worry, it's very cheap). I highly recommend Namecheap. I've registered a few domains with them and their customer service has been extremely helpful when I've had issues. They also have some of the lowest prices, a beautifully designed website, and support a free and open web (which GoDaddy does not). So first step is to go to namecheap and register a domain.

Once you have a shiny new domain you can follow Namecheap's tutorial or follow along here with me. Go to your domain list and click on your new domain. From there, go to the advanced DNS section and click on 'Add a new record'. We will be adding an 'A' record (Address Record). Input your public IP into the 'Value' field, and an '@' into the host field. Wait a few minutes and your domain name will be live!
At this point, I would also recommend adding a URL redirect record. Since port 80 is default and we are not using it, we would like to be auto redirected to the correct port. The Masked/Unmasked option is what displays in the browser's URL. For more info on DNS record types, click here.
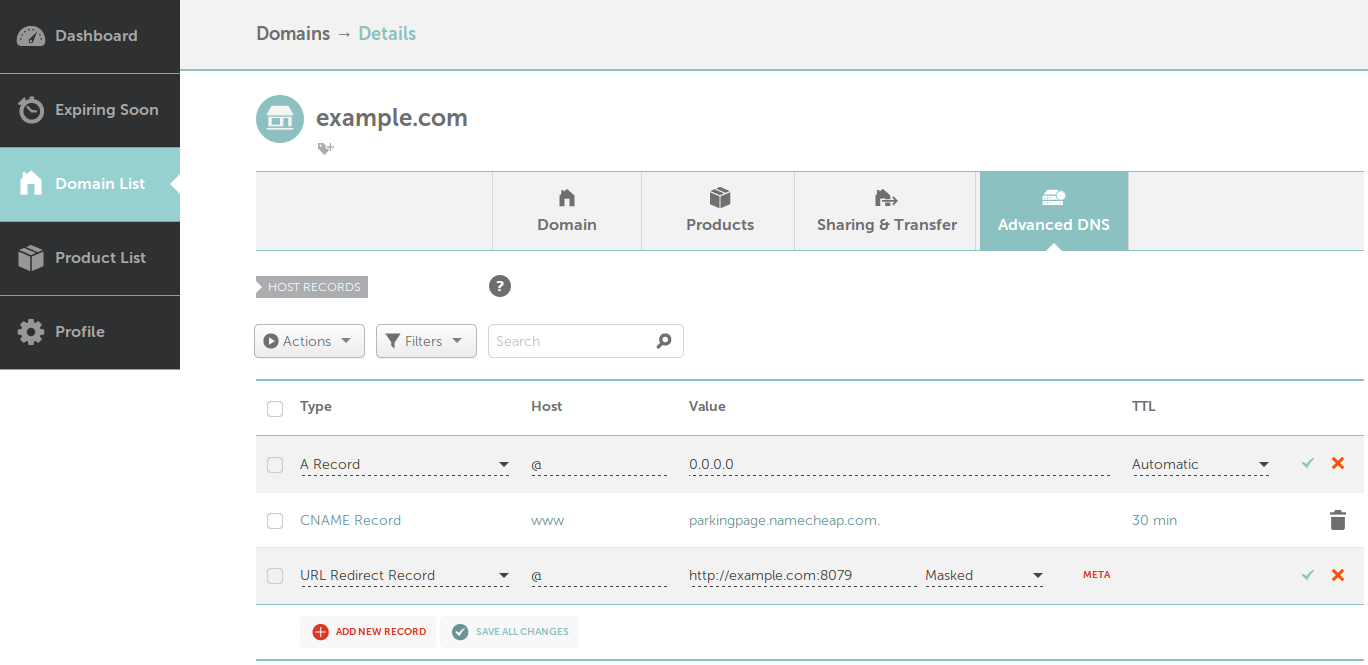
Don't forget to save them by clicking the 'Checkmark' icon.
Next Steps
If you only want the video stream to be on at certain times, you can use a built-in Linux program called Cron to auto turn it on and off. The notation can be a bit tricky, but it's pretty easy to set up. Simply edit the crontab file and add entries for each on/off item. You can follow the instructions in the Ubuntu community.
1
2
3
4
5
6
#setup Cron to automatically turn camera on and off
sudo crontab -e #use sudo if your commands require root access, other sudo is not needed here
#add lines like this to the end of the crontab file.
#These turn on Motion at 9am, and turns it off at 9pm everyday
0 9 * * * sudo motion
0 21 * * * sudo service motion stop
I noticed that the Pi also has issues with Wi-Fi randomly dropping out. To fix this, I tried setting 'wireless power off' in /etc/network/interfaces (as Google would suggest), but it didn't solve the problem. Instead I found a script, modified it a bit, and set it up to run every minute with Cron. So the Pi will reconnect within a minute if it cuts out, and the script is not resource intensive at all.
1
2
3
4
5
6
7
8
9
10
11
12
13
#auto reconnect to wifi if a drop is detected
sudo nano /home/reconnect_to_network.sh

########################################
#!/bin/bash

if ifconfig wlan0 | grep -q "inet addr:" ; then #check ifconfig output for 'inet addr' -> internet is connected
    echo "Network connection up!"
else #internet is down, tell Wi-Fi interface to go back up
    echo "Network connection down! Attempting reconnection."
    ifup --force wlan0
fi
########################################
1
2
3
#and my additional crontab entry. It runs every minute of every day
sudo crontab -e
* * * * * sudo /home/reconnect_to_network.sh #add this line to end of cron file
Beyond that there are a couple directions you can go. You can configure motion for multiple USB Cameras, save files when motion is detected, or try out different video capturing software (like ZoneMinder). Instead of having 2 password protected pages, you can embed the Motion stream on your web server without making it publicly available by itself. Then the only access to it would be through your web site. To do this you will need to proxy the stream to your web page with MJPEG Proxy Grab.
That's it! Thanks for checking out the post today, best of luck!
Updates
After setting this up, I had an issue with
1
2
sudo service motion stop
motion: unrecognized service #WTF?
However, 'sudo motion' still worked to start the program. Thus I could turn on motion but could not shut it down. After much Googling, I discovered this was an issue with Motion's init.d script (responsible for registering and stating daemons). I guess using the Git installation process messed it up somehow, and after some tweaking I got it to work. Here's what you do:
1
2
3
4
5
6
7
8
9
10
11
12
13
14
15
16
17
sudo nano /etc/init.d/motion #then copy+paste the text from [motion.init-Debian.in](https://github.com/sackmotion/motion/blob/master/motion.init-Debian.in) in the GitHub repo

sudo chmod 755 /etc/init.d/motion 	    #make motion init.d script executable
sudo chown root:root /etc/init.d/motion #owner and group owner of the file is root
sudo update-rc.d motion defaults 	      #enable script to be run when system starts/stops

#edit /etc/init.d/motion
#change the NAME, DAEMON, and PIDFILE variables at the top of the file. Leave 'PATH' as it is
NAME=motion
PATH=/bin:/usr/bin:/sbin:/usr/sbin
DAEMON=/usr/local/bin/motion
PIDFILE=/var/run/motion/$NAME.pid
#...
#In the start) section,
start-stop-daemon --start --pidfile $PIDFILE --exec $DAEMON --chuid root #change 'motion' at end of this line to root
#In the restart-motion) section,
start-stop-daemon --start --pidfile $PIDFILE --exec $DAEMON --chuid root #change 'motion' at end of this line to root
After running the cmds and editing the init.d file 'motion' will be registered as a daemon, and will run on boot. Hopefully this error doesn't happen to anyone else, but if it does it can now be easily fixed!