ecently I've been getting into Godot for 2D gamedev, and wanted to implement normal mapping to give my sprites some extra juice. Here I'll cover the process of how to create a normal map for 2d sprites and import them into Godot.
Creating a Normal Map
Normal Mapping is a lighting technique commonly found in 3D games for creating the appearance of bumps and imperfections on a texture. They can turn dull, low-polygon models into vibrant textures, and thus help combine performance and beauty. Since normal mapping is more common for 3D, there aren't too many 2D tools available to create them, but a great one is SpriteIlluminator ($40).
Drag your texture into SpriteIlluminator's editor. There are a bunch of tools to manually modify sprites, I used bevel (width 16, height 100%, smoothness 8%) + emboss (height 100, smoothness 1). And that's it! A few clicks and it's ready to go without any manual editing (though you can edit with the height, angle, structure, etc tools).
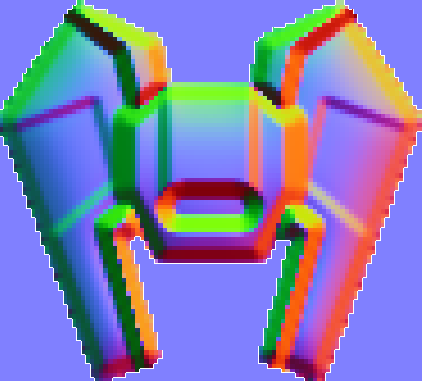
Once you have the sprite looking just how you want it, save the normals by clicking "Export Normals" in the top tool bar (paid version required). This tool also gives the option to directly save the lit textures as a static .png file. The lit textures would not dynamically interact with game lights, and thus would be more performant (ie static baking).
Integration with Godot
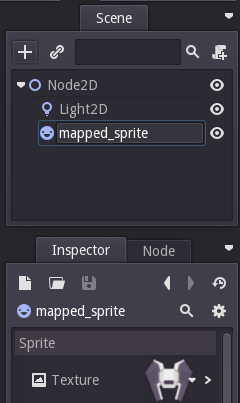
I discovered how to do this through the Godot example. Open up your Godot Editor and add a Node2D with Sprite and Light2D children. If you haven't done this before I highly recommend reading through all of Godot's documentation. It will help you understand the best way to architect your game with Godot, and prevent you from having to wrestle with the editor in the future.
Next, click on the sprite and the "Inspector" will appear in the bottom right - add your texture. Light2D also requires a texture, and note that it can impact the color of light emitted (so white's best).
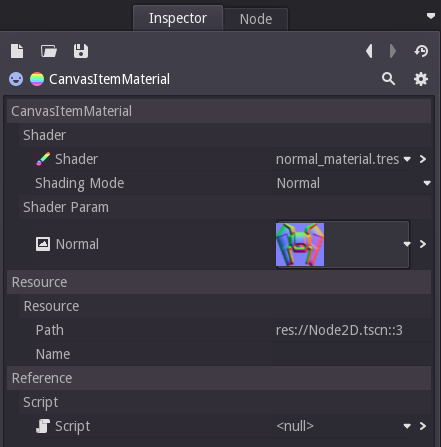
The Sprite's Inspector also has a CanvasItem section, scroll down to it and create a new Material. Go into this Material by clicking on the ">" button next to it. Create a new shader named normal_material.tres and copy paste the following code:
1
2
3
uniform texture normal;
//normal maps expect Y-up, but 2D is Y-down, so must mirror this.
NORMAL = tex(normal,UV).rgb * vec3(2.0,-2.0,1.0) - vec3(1.0,-1.0,0.0);
After doing so, a "Shader Param" section with a "Normal" variable will be added to the Shader. Use the dropdown to load your normal map's png file.
And voila! Normal mapping is done. Drag around the 2D light to watch it interact with your sprite.
You can also change properties of the light to modify its effect on the normal map. Click on the 2D light and modify texture, scale, color, energy, and mode in the inspector.
Sprites illuminated with and without normal mappings
Pixel perfect (anti-aliasing turned off) sprites illuminated and normal mapped
The second video displays what normal maps look like with anti-aliasing off, for those who want a pixel art aesthetic. This can be done through Scene > Project Settings > Image Loader > turn off gen_mipmaps and filter as described in this video.
Automation
Great, we have one sprite with a normal map, what about the other 300? To solve this we will utilize Godot's system of node instancing. First, create a new scene. In the top left of there is a menu with Scene, Import, Tools and Export options, click on Scene > New Scene. Next, create a Sprite node as root of the new scene.